How to Measure Conveyors
Simple rules for conveyor dimensions and specification
This is part three of our guide to measuring material handling equipment. When you want to lay out a conveyor, there are methods to measurement that can ensure the equipment fits where you need it to, interfaces with machinery, matches work station heights, and other critical measures.
Good conveyor applications rely on accurate dimensions (among other things)
Conveyor field dimensions rely on getting the fundamental measurements right. Those are usually the height from the floor and the width of the belt. Lengths come into play as well.
Heights
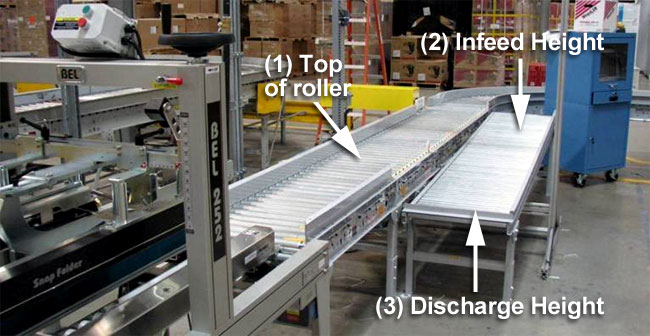
Conveyors are measured from the floor to the top of the rollers or belt. Heights are critical because they must match other conveyors, equipment, workstations, sensors/scanners, and other production machinery. Importantly, the conveyor height also dictates the height from which people work. But there can be more than one height, as illustrated in the above image. You have (1) Top of roller for the main line, (2) Infeed top-of-roller for the inclined work station conveyor, and (3) Discharge top-of-roller. If you are adding to a conveyor line like this one, it’s important to know all of these heights. If there are guardrails, those can also be measured and provided. They aren’t considered the critical measurement.
Widths
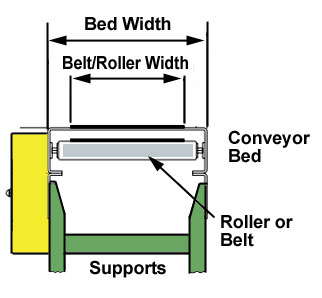 Conveyors have two width measurements: (1) Belt or roller width, and (2) Overall width. Both of these can be critical. If you are measuring existing conveyors for additions, note both dimensions. For a new conveyor, you should generally start with the width of your widest load to ensure that your conveyors can accommodate it. You should also make sure that the overall width fits in the area you need it to, and that both widths are correct for interfacing with existing conveyors, workstations, or machinery.
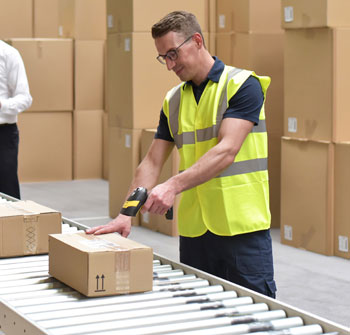
One of the critical dimensions for width is to discourage people from leaning over a running conveyor. Widths should be set so that people can reach the loads without bending, stretching or leaning. This is both safer and more ergonomic.
Lengths
Conveyor lengths should be measured from end to end, and placed using an authoritative baseline. Situate conveyors on the floor using column centerlines as noted below. To measure length accurately, use the overall width to fit conveyor into a space. The bed length is often represented on conveyor specifications, but it excludes assemblies at the ends of the line (things like pulleys or guards). If space is tight, the entire conveyor needs to fit into the area, so an accurate measurement is critical. Most conveyors can be modified to cover an area, even including items not specified in the bed length.

Other things to note about existing conveyors
If you are dealing with existing conveyors, find the brand name and model if possible. Many conveyor companies attach a serial number to their equipment. If you can find that number, note it when you begin your project. It will help us understand what’s in place and how to deal with it. If the conveyor has any other pertinent information, such as the presence of guard rails or crossovers, note those as well. Colors, dimensions, and any other pertinent information will help guide the project to success.
You should also indicate what devices might exist at each end of the conveyor, and the critical dimensions of those. You should also detail their functions and any power or other needs that could impact the project. For instance, in this same image, the folding device may have its own height that the conveyor must match. If possible, find the documentation for any attached machinery, where more details are available.
How to locate conveyors within a drawing
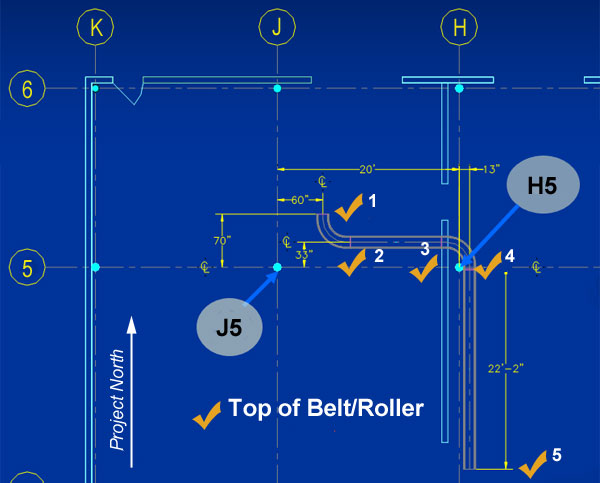
As we mentioned in part one of this series, accurate column placement and dimensions makes everything easier. As illustrated above, you can see how easy that makes it to place a conveyor system. To place conveyors on your floor, follow these steps:
- Use column center lines to place the conveyor (if you don’t have these, don’t worry)
- Note the conveyor’s locations by column – in this case, the conveyor is placed to the right of columns J5, and extend past H5.
- Note the top of belt/roller height in where conveyor sections meet, start or end
We will work with any type of drawing from detailed CAD renderings to hand drawn on napkins, but the more information available, the better.
Final thoughts
We can help you measure most any facility for conveyors from simple gravity to complex sortation or accumulation systems. These tips should help you get started as you plan your project, but you are always welcome to contact our conveyor experts as your project moves forward.
More resources
Tags: Space Optimization
Scott Stone is Cisco-Eagle's Vice President of Marketing with 35 years of experience in material handling, warehousing and industrial operations. His work is published in multiple industry journals an websites on a variety of warehousing topics. He writes about automation, warehousing, safety, manufacturing and other areas of concern for industrial operations and those who operate them.


